There are a wide variety of platforms available for airsoft sniper weapon systems, however all of these platforms fall under two categories. These are gas bolt actions and spring bolt actions, each with their fair share of advantages and disadvantages. The most commonly used of the two systems are spring bolt action rifles. Spring bolt action rifles use the force of the bolt-pull to lock back a piston which is caught by the sear. When the trigger is pulled, the sear drops and the piston is released, creating air pressure, which fires the BB. One of the advantages to using a spring bolt action system is that in order to field it you only need BB’s, magazines, and the strength to pull the bolt back, as opposed to other airsoft systems(not limited to bolt actions) which require green gas/propane, or a battery. The disadvantage of using the spring system is the much higher resistance of the bolt pull when compared to gas bolt actions, higher FPS springs even more so. For a high FPS spring bolt action build (550-600 FPS+) the bolt pull can be exhausting for quick follow up shots if one is not accustomed to using the system.
Fielding a gas bolt action rifle is a much different experience. These rifles use a green gas/propane filled magazine. When the bolt is brought back and the BB chambered, the internal hammer strikes a valve knocker once fired, which in turn, strikes the valve on the magazine. This releases the gas which then propels the round. The advantages to running a gas bolt action system, is there is little to no resistance on the bolt pull, as the gas is what fires the round, which means the rifle can be cycled very quickly. Another feature unique to gas bolt actions is the ability to use short bolt pulls. On the gas rifles, the bolt only needs to be pulled far enough to reset the internal hammer and chamber the next round, which only requires the bolt being pulled a short distance. This is a much faster way to fire follow up shots as compared to the spring systems, which require a heavy, full bolt pull for each shot. The disadvantage to using a gas system, as well as short stroking the bolt however, is the more you shoot, the lower your fps becomes, and you lose your consistency. This is because as you are using the gas in your magazine, the pressure is dropping, which affects your fps per shot, and therefore affects your range. This is because the backspin the hop-up puts on the BB is dependent upon its velocity, and with each shot decreasing in velocity, the backspin is affected as well. This means one must compensate for the drop of the BB as you continue to fire. This can be remedied by HPA tapping the magazine (drilling and tapping the magazine to use external air tanks), but can be costly/time consuming to do so. As you can see, there are plenty of advantages and disadvantages to each system, and which is best for you is dependent primarily upon your play style, and what you’d like your rifle to do. For consistency, a well tuned spring system, or an HPA’d gas system may be best for you. If you want something capable of faster follow up shots and high velocity out of the box, a gas system may better suit you.
Upgrading Bolt Action Rifles
Having familiarized ourselves with the two systems, its time to talk about upgrading them. Of the two systems, gas systems, while just as complex if not more so than spring systems, generally require less attention in the upgrade department. While the disassembly is more complex, the most commonly upgraded parts of these systems are the inner barrels, hop up components, and magazine valves. This is because gas systems generally shoot at a higher velocity out of the box than spring systems (maintaining higher FPS being the bulk of upgrades for spring systems). Once you’ve achieved the Velocity you’d like, the rest of your upgrades are focused on range and accuracy, that being the hop-up bucking, hop-up unit, and inner barrel. Due to the previously mentioned nature of gas systems out of the box, you can usually skip right to that step, or if you’re looking for consistency, HPA tap the magazines as well.
The focus of this section is about spring bolt action systems, the different platform types, and some of the intricacies of their upgrade components. For spring bolt action platforms, the two most widely used and available are the VSR-10 and Type 96 models. The VSR-10 or clones/compatible rifles of the rifle, is based off of the Tokyo Marui VSR-10 spring rifle. Some of the rifles compatible with its after market parts include the Echo-1 PSR, JG BAR-10, and some of the WELL sniper rifles. The other most common platform is the Type 96, which is based off of the Maruzen APS2 Type 96 (often shortened to Type 96 to avoid confusion). Some of its compatible rifles include the UTG Shadow Ops rifles, some of the WELL rifles, and most of the off brand rifles using the model name “L-96”. Some of the less popular, but still notable platforms are the L-96 AWS with its original model being the Tokyo Marui L-96 AWS, and the APS2(NOT the Type 96 version) which is based off of the original Maruzen APS2 rifle. For Type 96 and L-96 AWS owners, be mindful of what components you’re buying, as they are two very different platforms and are not compatible. For all of the major platform designs there are a variety of clone variants available, some being completely compatible, while others have proprietary components as well. Be sure to do sufficient research on your model before buying after market parts.
Now that we’ve covered the primary platforms, we will touch base on the fundamentals of an overhaul upgrade (completely upgraded internals) for a spring system, specifically the VSR-10 series, using the action army upgrade parts. There is also the option to HPA your spring VSR series rifle with the Wolverine Bolt system, which converts your spring cylinder into an HPA system, but that will be covered in the HPA guide. As for the standard upgradeWe’ll go over each part (or assembly of parts), what it does, and why we’re upgrading it. When it comes down to it, the majority of the parts being replaced, are being done so because of spring tension and pressure. Upgrade parts made out of higher grade materials so that they may endure the high stress nature of high velocity bolt action builds. The spring is where this all starts. A high tension spring is used to create more air pressure as the piston is released, getting us a higher FPS. Something like the action army M170 spring (44374) which will get us about { } FPS in our build. Now that our rifle is shooting a higher FPS, we have to make sure the rest of the components are capable of handling the higher tension. Most rifles come with a plastic spring guide, so we’ll want to replace that with a metal one to make sure it doesn’t snap, and for this we’ll use (44199). From there we’ll also want an upgraded piston, usually metal with a better O-ring which makes for a better air seal. While some of the polymer pistons are able to withstand a fair amount of punishment, the back end of the piston that catches the sear will wear over time and at some point, will no longer catch. For the piston we’ll use the Action Army 90 degree (the one that comes with the zero trigger however). With the primary FPS components down, we’ll want to put all of it into an upgraded cylinder. This ensures that the bolt handle area doesn’t break from the rest of the cylinder, as they are usually stamped/pressed or poorly pinned from the factory. The upgraded cylinders, being made of a better material, have sturdier threads for the cylinder head, so that the high pressure your piston is hitting the cylinder head at, doesn’t damage or potentially destroy your threads, knocking your cylinder head out. For the cylinder, and cylinder head (it comes as a set), we’ll use (44204). Last but not least to complete the cylinder assembly upgrade is the Zero trigger assembly. Like the piston end, with high velocity builds, the sear that catches the piston(2nd Sear) will wear to the point where it no longer catches, as they are often made of cheap metal. This applies to just about all of the other components in the trigger assembly as well, which if you’re doing a high FPS build, you’ll want to just completely replace. For that we’ll be using the Action Army Zero Trigger/Piston (44197), a very critical component. One of the benefits to using the zero trigger aside from its excellent durability, is that its adjustable, meaning you can adjust the length of the trigger pull to your preference.
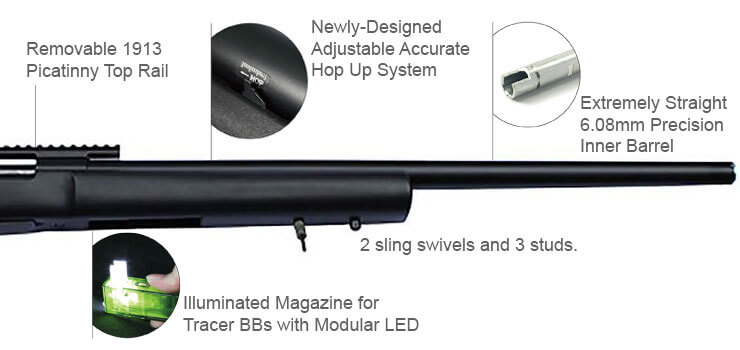
With the cylinder components upgraded and ready for action, all that’s left is the front end of the rifle! For better accuracy and range, we’ll upgrade the hop-up unit, hop-up bucking, and inner barrel. For the Hop-up unit we’ll be using the Action Army Chamber (44351). This is a metal hop-up chamber that allows for minute hop adjustment using an allen key, and uses traditional VSR style buckings as well (the PDI VSR chamber uses AEG buckings and barrels). This chamber is ideal as it seals best with the action army cylinder head we used. For the bucking we’re going to use the Maple Leaf Autobot 70 Degree VSR bucking. These fit really well in the Action Army Chamber and they’ve got great range and consistent accuracy. So now that we’ve got the hop-up components taken care of, all that’s left is the inner barrel. For the diameter we’ll go with a 6.01 tight-bore, which will give us tighter groupings and a little more velocity, but for the length, we’ve got two options. We can go with the standard length inner barrel, which for the standard VSR is a 430mm, or, we can put a suppressor adapter on the front of the rifle and use a mock suppressor to hide an even longer inner barrel, giving us even more velocity, as well as a little bit better range. For this build we’ll be using the standard length, but the mock suppressor route is a very common and viable option for those really looking to push the limit. Now that we know what length and bore we’re using, we’ll use the Action army 6.01 VSR barrel (44353). Its important to note that when you are choosing a barrel for your rifle, that you differentiate between VSR barrels and AEG barrels, and be aware of which of the two your hop-up unit uses. Nothing is more disappointing than ordering a sweet inner barrel, only to find it doesn’t fit because it isn’t cut for VSR buckings and vice versa. With the barrel and hop-up components covered, we’ve now got a completely upgraded rifle! Get yourself some heavy weight BB’s(.30-.40 preferably), set your hop-up, and throw a sweet optic on it and you’re ready to go!
Diagnosing Bolt Action Rifles
In this segment we’ll go over some of the common issues you may run into while using a bolt action rifle. The first we’ll cover is slam firing. Slam firing is when you pull the bolt back, and instead of locking into place so you may fire the round, it slams forward and won’t fire at all. It is the problem for roughly 80% of all bolt actions brought in to be looked at in our store. This happens because the sear is not catching the piston, which is generally the result of one of two things. The piston back end of the piston has sheared/stripped and bypasses the sear, or the sear itself is worn and won’t catch the piston. Sometimes both the piston and the sear are worn to the point where neither of them will catch, even with its counterpart replaced. Wearing on these parts typically happens because most stock rifles are using higher pressure springs than their support parts are really capable of handling long term. For longevity, it is best to replace the sear/trigger and piston first if you’d like a reliable rifle while still in the process of upgrading the other components. Aside from slam firing, there is one other common issue many bolt actions users run into, and that is BB curving. While not an uncommon problem for airsoft guns in general, it is far more noticeable when using a system that is dependent on being able to place well timed, individual shots on target consistently. For this issue there are a few likely causes. Most commonly, its just a bucking/barrel alignment issue. This is when the barrel/hop-up bucking has slightly shifted inside of the unit, causing the hop-up nub to be hit at an angle, which creates backspin at that particular angle. If the rifle is consistently to one particular side, this is likely the issue. The fix is as simple as taking the barrel out and reinstalling it properly. For guns shooting with a lot of left/right variation, it may just be the result of having a lower quality, or well worn bucking, which is easily remedied via a new bucking. Another possible cause for curving, seen primarily on clone variants of the VSR-10 and Type 96 rifles, is the orange plastic cap being made incorrectly, causing the bb to hit the side of the cap as it exits the barrel. This can result in the BB’s shattering or chipping, as well as extreme left and right shot placement. To correct this, take the inner barrel/hop-up out of the outer barrel assembly, find the area on the cap that the BB is hitting, and file it down to an appropriate level.
Other Notes
Having gone through all of the basics on what to replace and why, there are a few really important things to know as you buy and install upgrade parts for the rifle. In the example, we used almost entirely Action Army parts, but in some cases where you are using parts from a variety of different manufacturers, things aren’t quite as simple. A critical piece of information being the piston angle. For the Zero Trigger we used in the build above, the trigger unit came with a piston, so we didn’t have to worry about the angle. However, if you are buying everything piece by piece, and your trigger doesn’t come with a piston, you need to know if the sear is designed for a 45 degree or a 90 degree piston angle. If you use the incorrect angle, the sear won’t engage the piston and lock into place, which will result in a slam fire. If you’re replacing the trigger as well as the piston at the same time, the trigger generally comes with the piston, or the piston end which can be swapped out on some pistons. If you’re buying them separately, its good to know that stock pistons are typically 45 degrees, while zero triggers and the like usually come with 90 degree pistons. While this is usually the case, you always want to check your stock piston first before ordering an upgraded one if you are just buying the piston. You can easily tell the difference when looking at the piston, as the 45 degree is a sloped surface, while the 90 degree is a flat edge.
While many clone(Not the original Marui, Maruzen, etc.) bolt action rifles are capable of using their counterparts aftermarket upgrade parts, there are quite a few that do not. Its critical to research the make and model of your rifle, and to look for feedback from other players as to what parts have worked, and which ones have not. There are several rifles that use almost identical systems to the original Marui or Type 96 that are off-spec just enough to make them incompatible with their upgrade parts. Some models even have particular parts that are compatible, while still having some proprietary parts.